One of the first things that you run across with EDI is setting up the Interchange ID’s. Since this is done so frequently it is nice to compartmentalize and standardize it. It also allows you to change the ID’s without having to recompile your code.
To do so create an .xml file named ISA.dtd
This file will define the structure and data elements that are used for the interchange ID’s.
Create it like this
ELEMENT Interchange (ISA,GS)>
ELEMENT GS (APPLICATIONSENDERCODE,APPLICATIONRECEIVERCODE)>
ELEMENT ISA (INTERCHANGEID1,INTERCHANGESENDERID,INTERCHANGEID2,INTERCHANGERECEIVERID)>
ELEMENT INTERCHANGEID1 (#PCDATA)>
ELEMENT INTERCHANGESENDERID (#PCDATA)>
ELEMENT INTERCHANGEID2 (#PCDATA)>
ELEMENT INTERCHANGERECEIVERID (#PCDATA)>
ELEMENT APPLICATIONSENDERCODE (#PCDATA)>
ELEMENT APPLICATIONRECEIVERCODE (#PCDATA)>
Next create a C:\Example folder then create an XML file to use as a template following the above data structure and save it as ISA.xml in the folder. Mapforce uses hardcoded paths so when you compile the code this is where it will look for the .XML file.
xml version="1.0" encoding="UTF-8"?>
<Interchange>
<ISA>
<INTERCHANGEID1>01INTERCHANGEID1>
<INTERCHANGESENDERID>111111INTERCHANGESENDERID>
<INTERCHANGEID2>02INTERCHANGEID2>
<INTERCHANGERECEIVERID>222222INTERCHANGERECEIVERID>
ISA>
<GS>
<APPLICATIONSENDERCODE>AAAAAPPLICATIONSENDERCODE>
<APPLICATIONRECEIVERCODE>BBBBAPPLICATIONRECEIVERCODE>
GS>
Interchange>
Now we will add this into structure into Mapforce.
Click on the insert XML button (It’s on the top left of the toolbar)

Select the ISA.dtd that you created and then the ISA.xml as the XML template.
Choose Interchange as the root, this will bring it into Mapforce like this.

Next, use the insert EDI button

and pick a type of EDI document. For this example let’s choose an outgoing X12 invoice.

So click the X12 tab and then scroll down and choose the 810 (Invoice). When brought into Mapforce it will look like the below.

Next, we want to connect our XML outputs to the EDI inputs. (An input will be a triangle on the left-hand side, and an output is a triangle on the right-hand side)

So now we want to drag and drop from our outputs to our desired inputs. You can either press the + signs to expand out the EDI descriptor or as you drag over them they will expand for you. Expand the ISA, and GS elements. To make a connection you can start by selecting either the output arrow, or the data element name (I prefer the name since it is more reliable) and simply drag it to the input that you want. (Once again, drag it either to the input arrow or the name of the data element)
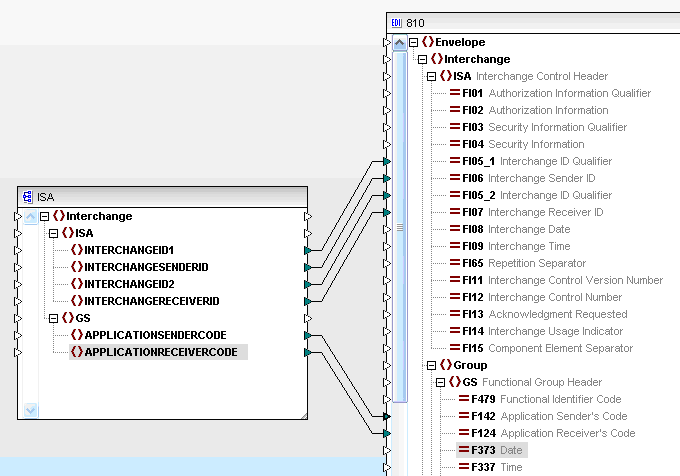
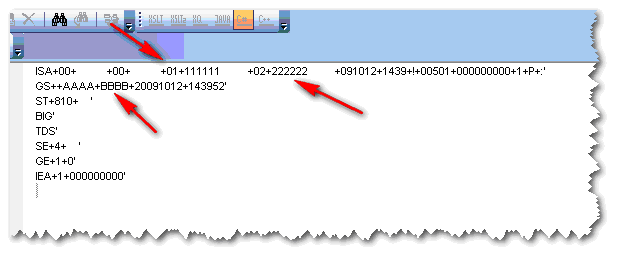
So for this example we want to connect INTERCHANGEID1 to FI05_1 Interchange ID Qualifier, INTERCHANGESERNDERID to Interchange Sender ID, and continue on down the line. Anytime we want to see what our output is going to be click on the Output tab. (To go back click on the mapping tab)

At the moment you will notice that in the messages window it brings up a bunch of errors. This is because we don’t have connections to required data elements.

You should recognize the Interchange ID’s that we created in our ISA.xml file. You will also see that Mapforce automatically fills in some of the relevant data.
This is the default behavior. If you want to disable it then right click on the EDI 810 component and uncheck the Auto-complete missing fields.
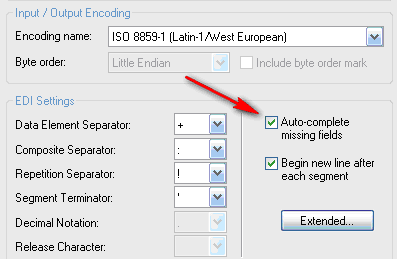
You will also notice that this is where you can specify your various separators. Now that you have the ID’s squared away the next logical thing to create are the Control Numbers. Stay tuned for the next post!
http://altovamapforceedi.blogspot.com/2010/07/control-numbers.html
http://altovamapforceedi.blogspot.com/2010/07/control-numbers.html
No comments:
Post a Comment